If you have bought a new HP laptop or already you have and don’t know how to screenshot on an HP laptop then don’t need to worry, this is the reason I have created this guide. Also, it doesn’t matter which HP laptop series you have like Pavilion, Envy, OMEN, etc., it works for almost all the series.
Taking a screenshot is one of the quick and easy ways to save anything related to your studies, or work, and can share it as an image file with your friends or colleagues. This is a very helpful feature whether you are a student, working professional, homemaker, or anyone who can take a snapshot of their work-related info and save it as an image file.
For instance, if you are a teacher at school/college and you want to share something which is helpful for students. But if you can’t able to save that online file then you can easily take a snapshot of that and share it with your students.
Apart from this, when you make an online payment of some big amount and you want something as a receipt or proof then you can easily take a screenshot of that and save it on your laptop. However, it helps you in many ways.
Well, here in this article, I’ll share with you 5 easy ways to take a screenshot on your HP laptop. All these 5 methods work without any third-party app. There are some paid apps also available in the market but I don’t recommend them because this in-built feature is pretty good.
I know you are eager to know about these methods, so let’s take a look at the 5 easy ways to take screenshots on your HP laptop.
How To Screenshot On HP Laptop
1. Take A Screenshot By Using Windows + W Key
This “Windows + W” shortcut key works well if you want to take a screenshot of the whole screen of your HP laptop. Also, if you want to crop and save some selective part of the screen then you can do that by using its provided tools too. After that, you can save it wherever you want to save it on your laptop.
Once you press that Windows + W shortcut key together a small pop-up will appear at the bottom right corner. Which you can see in the given below image:
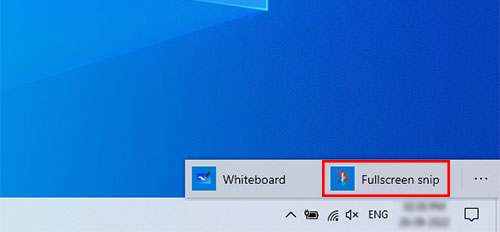
Now, you need to click on the “Fullscreen Snip” and it will take a screenshot of the whole screen and open it in an editor where you can edit that screenshot by using its given tools. As you can highlight the screenshot through its color markers and highlighters.
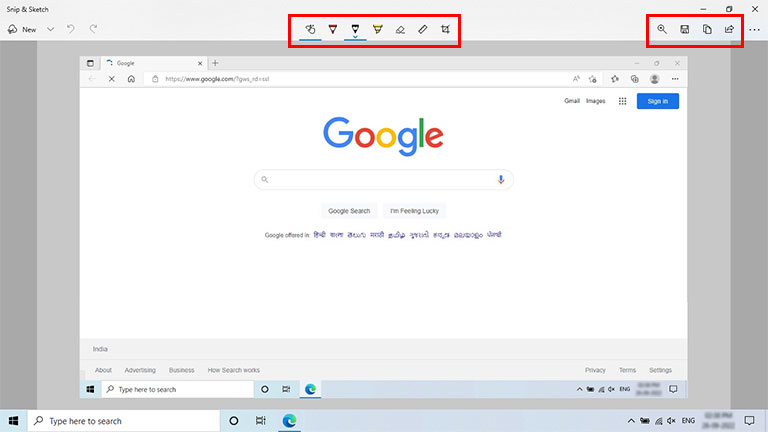
Also, if you don’t want the screenshot of the whole screen then you can crop the selected part of it by using its cropping tool. Once the customization is done you can save that screenshot, copy that or share it with your friends. You can check that in the below image:
2. Take A Screenshot By Using Windows + PrntScr Key
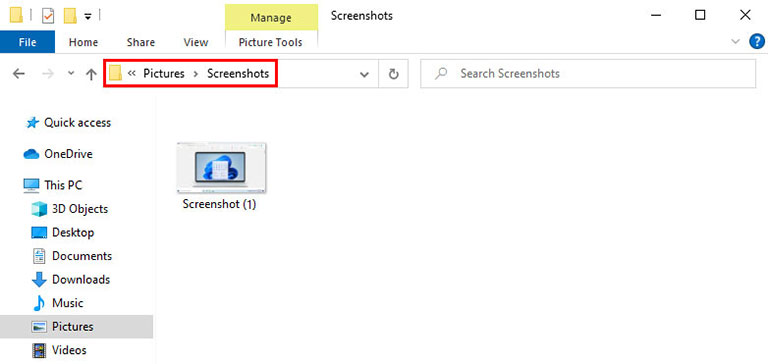
This is one of the best methods which I personally like because it is a very easy and quick way to take a screenshot and save it on your HP laptop. By pressing this “Windows + PrtScn” key, it saves the screenshot of the whole screen in the Screenshots folder.
This is one of the best methods which I personally like because it is a very easy and quick way to take a screenshot and save it on your HP laptop. By pressing this Windows + PrtScn key your screen brightness will dull for just a second and it saves the screenshot of the whole screen in jpg file format in the Screenshots folder.
To find your screenshots you need to go to Pictures -> Screenshots.
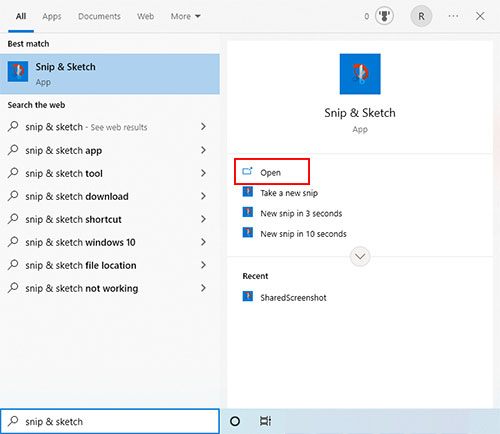
3. Take A Screenshot By Using Windows In Built Snip & Sketch Tool
Actually, in the year 2018, Microsoft replaced the “Snipping Tool” with “Snip & Sketch” as part of a Windows 10 update and also improved some features. So, to use this tool you need to go to the Start menu and type “Snip & Sketch” in the given search bar and then click on Open, the app will be open.
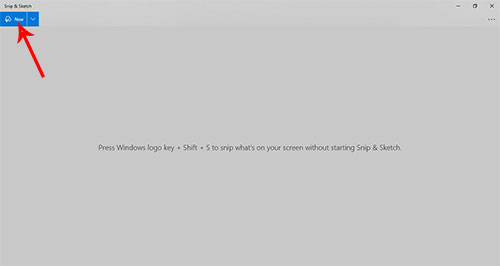
Once it’s open, now click on the New button which is at the top left corner.
After clicking on it, you will see the screen brightness will dull and show you 4 different screenshot options as you can see in the given below image.
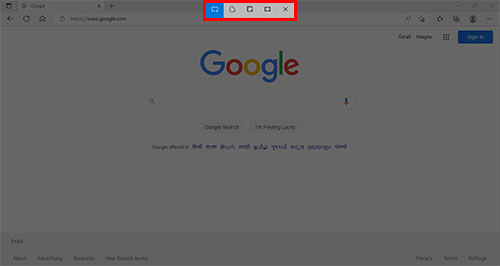
Now, you can go with the one from any of the 4 options, which is suitable for you.
- Rectangular Snip: As per its name, you can understand that it’ll take the screenshot in a rectangle shape. This tool allows you to capture the whole screen or the portion of the screen easily in a rectangular shape.
- Freeform Snip: By using this Freeform Snip tool you can capture the screen in any shape like ovular, circular, or any freeform shape which you can able to draw with it.
- Window Snip: If you want a screenshot of the active window then this is the best option for you because you can easily do that with just a single click.
- Fullscreen Snip: By clicking this option it takes the entire screen’s screenshot along with the taskbar.
After using one of the above you can save it on your laptop or you can share it on your social media. Also, the captured screenshot saves on the clipboard so you can paste it into any of your files.
4. Take A Screenshot By Using Windows + Shift + S Key
Actually, “Windows + Shift + S” is the shortcut key of the above-mentioned Windows in-built tool called the “Snip & Sketch“. So, if you don’t want to go to the Start menu and find the app, you can use this shortcut key.
But while you use this shortcut key it will directly show you the screenshot window and not the Snip & Sketch app window. Just like the below-given image:
5. Take A Screenshot By Using Windows + G Key
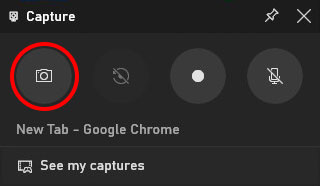
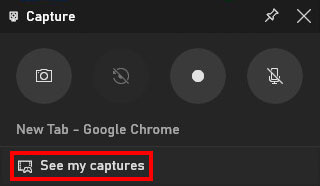
This is the last method on this list of taking a screenshot on an HP laptop. Once you press the “Windows + G” shortcut key it will open the Game Bar where you can see the “Capture” option to take a screenshot. The Capture button has the Camera icon on it, so you can easily understand and also you can see the image given below.
In the Gaming Bar, you will get to see the number of options which includes Capture, Live streaming, Recording, and many more. The best thing about this app is that it saves the screenshot with the name of the file or application or folder or web page that you are taking of screenshot. So, it makes it very easy for you to remember about that which thing screenshot is this.
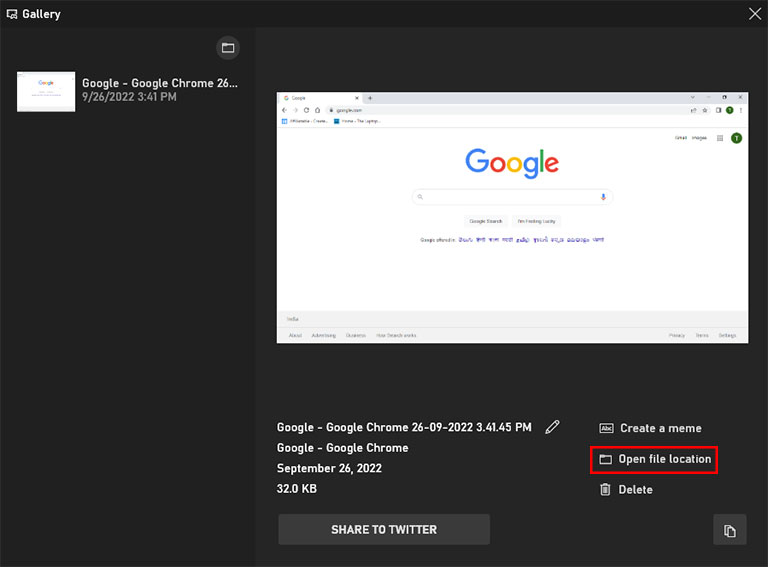
To access the screenshot image which is taken by using this app, there are two methods. The first one is you need to click on “See my captures“, which you can see at the bottom of the Capture window.
After that, the Gallery window will open where you can see the “Open file location” at the bottom right you just need to click on that, it will open the file explorer to access your screenshot.
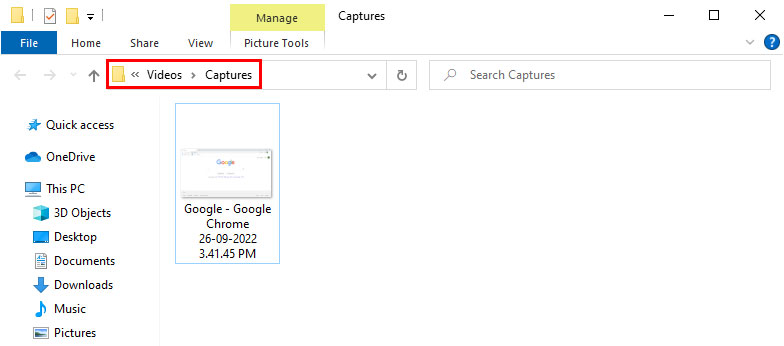
The second method is that simply follow the path which is highlighted in the below given image.
Generally, this method is mostly used by gamers who do live streaming because they can save some best moments while playing games. Also, they can use to take snapshots of their game’s leaderboard.
Final Verdict
Well, these are the 5 methods which you can use to take screenshots on your HP laptop. All these methods are easy to use but it also depends upon you which method is suitable for you. Also, these are the in-built app so you do not need to install any third-party app.
As I have told at the beginning of this article, these in-built apps work very well and that’s why there is no need to spend your money on any third-party app.
That’s it this is from my side. Still, if you have any questions related to these methods feel free to ask me via below comment box.

Hi! I am Rupesh Hingu a tech enthusiast, especially for laptops, and been in the tech industry for the last 7 years. I am passionate about blogging and love to review laptops and write in-depth buying guides and how-to tips.